Redis实战案例 |
您所在的位置:网站首页 › redis 缓存实战 › Redis实战案例 |
Redis实战案例
|
文章目录
1、SpringBoot整合Redis1.1、新建项目1.2、接口编写1.3、集成Redis1.3、测试1.4、序列化问题
2、Redis实现分布式缓存2.1、背景介绍2.2、代码编写2.3、缓存改造2.4、小结
3、Redis+AOP+自定义注解,优雅实现分布式缓存3.1、自定义注解3.2、AOP切面类3.3、测试3.4、小结
4、Redis实现分布式锁,解决高并发库存超卖问题4.1、初始化库存4.2、下单接口4.3、秒杀测试
5、Redis+AOP+自定义注解,优雅实现分布式锁5.1、自定义注解5.2、AOP切面类5.3、测试5.4、小结
6、Redis+拦截器+自定义注解,实现接口幂等性校验方案6.1、常见方案介绍6.2、防重Token令牌介绍6.3、自定义注解6.4、拦截器6.5、配置拦截器6.6、下单接口6.7、测试6.8、小结
7、Redis+拦截器+自定义注解,实现接口防刷功能7.1、防刷概述7.2、自定义注解7.3、拦截器7.4、配置拦截器7.5、接口准备7.6、测试7.7、小结
8、总结
1、SpringBoot整合Redis
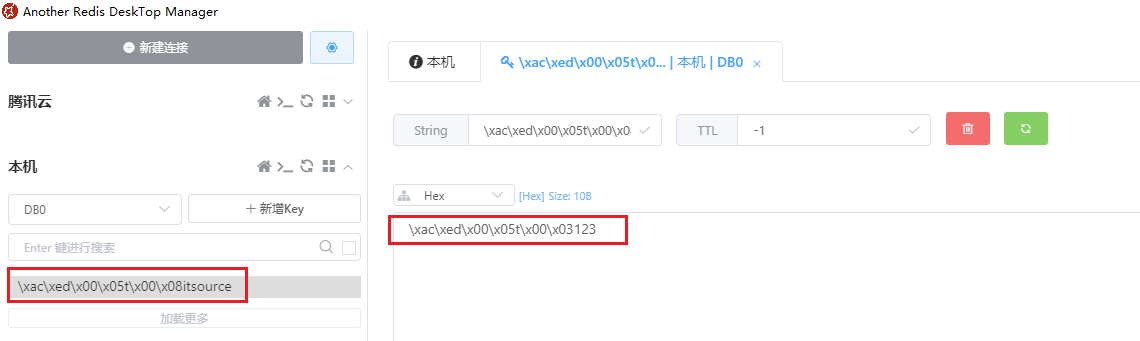
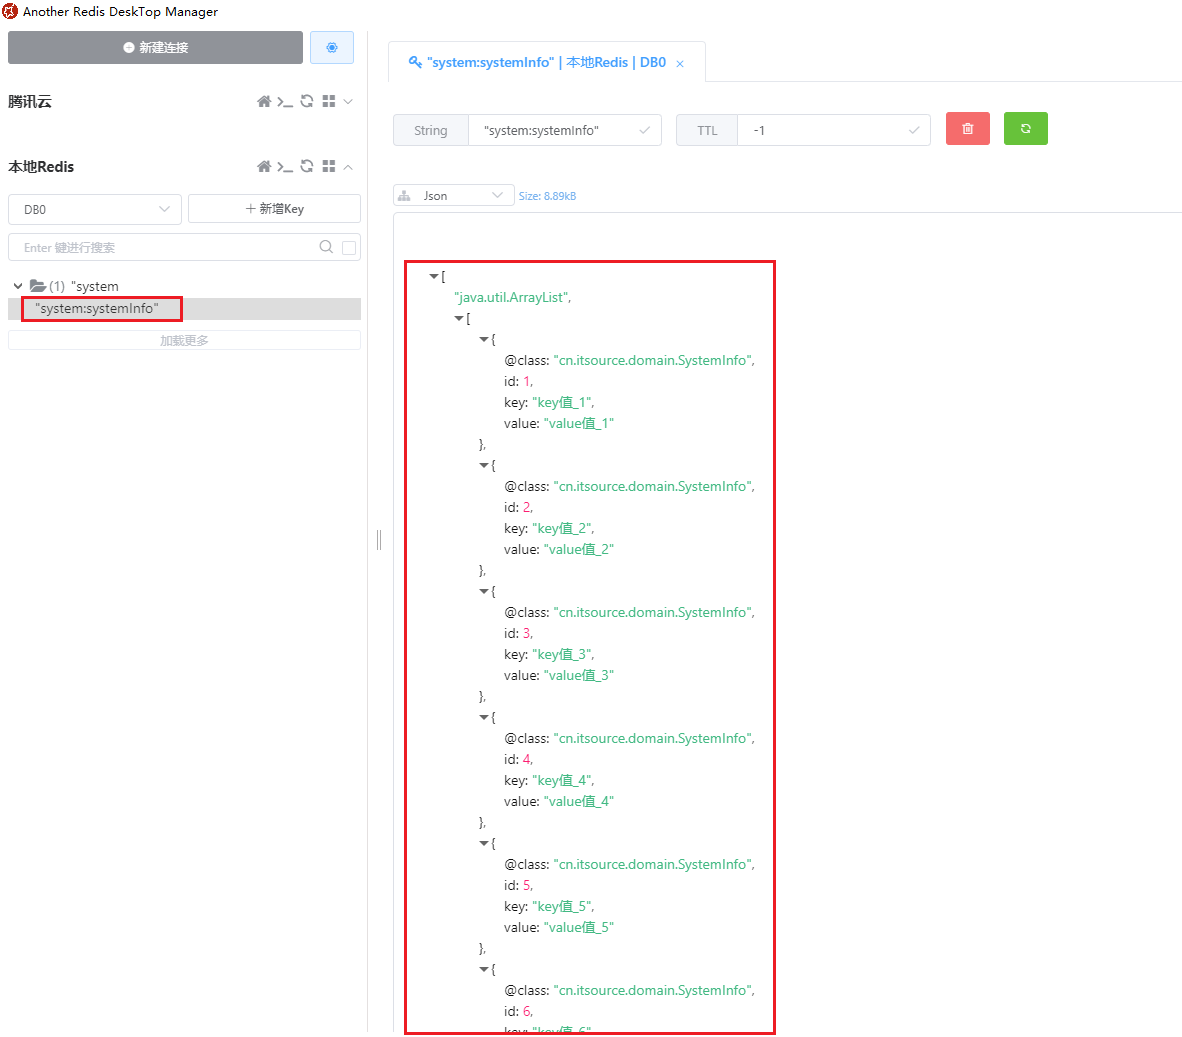
首先我们新建一个基于maven构建的项目,加入SpringBoot和Redis相关依赖,写一个接口进行测试,看是否可以对Redis进行存值和取值 1.1、新建项目IDEA中新建一个maven项目,然后pom.xml中导入下面依赖: 4.0.0 cn.itsource RedisDemo 1.0-SNAPSHOT org.springframework.boot spring-boot-starter-parent 2.0.5.RELEASE org.springframework.boot spring-boot-starter-web然后编写启动类: package cn.itsource; import org.springframework.boot.SpringApplication; import org.springframework.boot.autoconfigure.SpringBootApplication; /** *启动类 * * @author 波波老师(weixin : javabobo0513) */ @SpringBootApplication public class App { public static void main(String[] args){ SpringApplication.run(App.class, args); } }resources目录下新建application.yml,内容如下: server: #启动端口 port: 8001 1.2、接口编写编写一个接口测试一下是否可以正常访问: package cn.itsource.controller; import org.springframework.web.bind.annotation.GetMapping; import org.springframework.web.bind.annotation.RequestMapping; import org.springframework.web.bind.annotation.RestController; /** *测试类 * * @author 波波老师(weixin : javabobo0513) */ @RestController @RequestMapping("/test") public class TestController { @GetMapping("/test01") public String test(){ return "欢迎来到itsource-Redis学习课堂"; } } 1.3、集成Redis首先添加相关依赖: org.springframework.boot spring-boot-starter-data-redis有需要的话,还可以添加相关工具包: org.projectlombok lombok com.alibaba fastjson 1.2.50然后yml文件中新增有关Redis的参数信息: spring: #Redis配置 redis: #Redis服务器IP地址 host: 127.0.0.1 #Redis端口 port: 6379 #Redis服务器连接密码(默认为空) password: 123456 #Redis数据库索引(默认为0) database: 0 #连接超时时间(毫秒) timeout: 2000000 jedis: pool: #连接池最大连接数(使用负值表示没有限制) max-active: 20 #连接池最大阻塞等待时间(使用负值表示没有限制) max-wait: -1 #连接池中的最大空闲连接 max-idle: 10 #连接池中的最小空闲连接 min-idle: 0然后编写测试接口,如下: package cn.itsource.controller; import org.springframework.data.redis.core.RedisTemplate; import org.springframework.web.bind.annotation.GetMapping; import org.springframework.web.bind.annotation.PathVariable; import org.springframework.web.bind.annotation.RequestMapping; import org.springframework.web.bind.annotation.RestController; import javax.annotation.Resource; import java.util.concurrent.TimeUnit; /** *测试类 * * @author 波波老师(weixin : javabobo0513) */ @RestController @RequestMapping("/test") public class TestController { @Resource private RedisTemplate redisTemplate; @GetMapping("/redisTest/{value}") public String redistTest(@PathVariable("value") String value){ //将数据存入Redis redisTemplate.opsForValue().set("istource", "itsource=" + value, 2, TimeUnit.MINUTES); //从Redis中取值 String valueFromRedis = (String)redisTemplate.opsForValue().get("istource"); return valueFromRedis; } @GetMapping("/test01") public String test(){ return "欢迎来到itsource-Redis学习课堂"; } } 1.3、测试浏览器访问:http://localhost:8001/test/redisTest/123,可以看到浏览器就会显示:itsource=123,表示我们测试成功 1.4、序列化问题我们用【Another Redis Desktop Manager】工具去查看Redis中的值,如下:
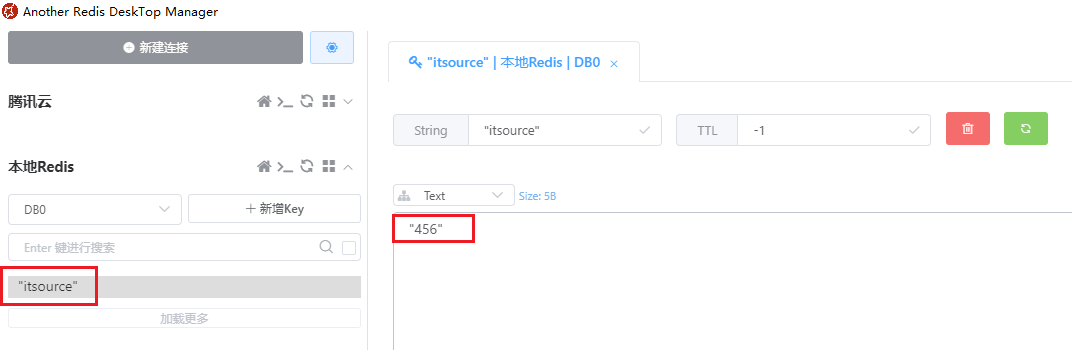
我们发现key和value的值确实存进去了,但是发现有类似乱码的东西存在,这是为什么呢? 这是因为:Redis会默认使用 JdkSerializationRedisSerializer 这个对象对key和value进行序列化后进行保存,可能会产生16进制的数据(看起来像乱码),那么怎么才能存进去我们看得懂的数据呢? 这就需要用其他序列化对象进行序列化了,下面我们就来写一个配置类对key和value进行序列化: package cn.itsource.config; import org.springframework.beans.factory.annotation.Autowired; import org.springframework.cache.annotation.CachingConfigurerSupport; import org.springframework.context.annotation.Bean; import org.springframework.context.annotation.Configuration; import org.springframework.data.redis.connection.RedisConnectionFactory; import org.springframework.data.redis.core.RedisTemplate; import org.springframework.data.redis.serializer.GenericJackson2JsonRedisSerializer; /** * @desc Redis配置类,目的是做序列化 * @author 波波老师(微信:javabobo0513) */ @Configuration public class CacheConfig extends CachingConfigurerSupport { @Autowired private RedisConnectionFactory factory; /** * 向Spring容器中注入一个 RedisTemplate 对象 * 采用 GenericJackson2JsonRedisSerializer 这个序列化器进行序列化 */ @Bean public RedisTemplate redisTemplate() { RedisTemplate redisTemplate = new RedisTemplate(); redisTemplate.setConnectionFactory(factory); //序列化器 GenericJackson2JsonRedisSerializer genericJackson2JsonRedisSerializer = new GenericJackson2JsonRedisSerializer(); //String数据key的序列化 redisTemplate.setKeySerializer(genericJackson2JsonRedisSerializer); //String数据value的序列化 redisTemplate.setValueSerializer(genericJackson2JsonRedisSerializer); //hash结构key的序列化 redisTemplate.setHashKeySerializer(genericJackson2JsonRedisSerializer); //hash结构value的序列化 redisTemplate.setHashValueSerializer(genericJackson2JsonRedisSerializer); return redisTemplate; } }我们在测试一下,发现:
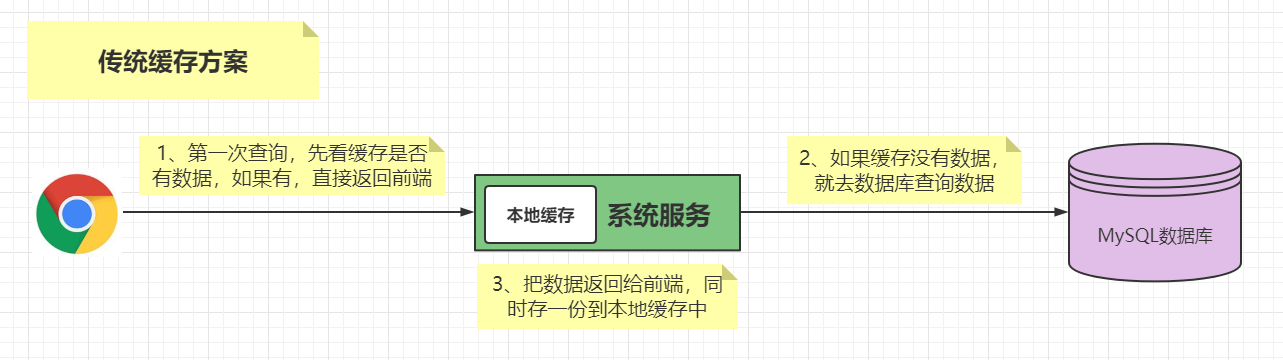
这样就OK了,存的什么值我们就看的非常清楚了 2、Redis实现分布式缓存 2.1、背景介绍项目中如果查询数据是直接到MySQL数据库中查询的话,会查磁盘走IO,效率会比较低,所以现在一般项目中都会使用缓存,目的就是提高查询数据的速度,将数据存入缓存中,也就是内存中,这样查询效率大大提高 传统缓存方案:
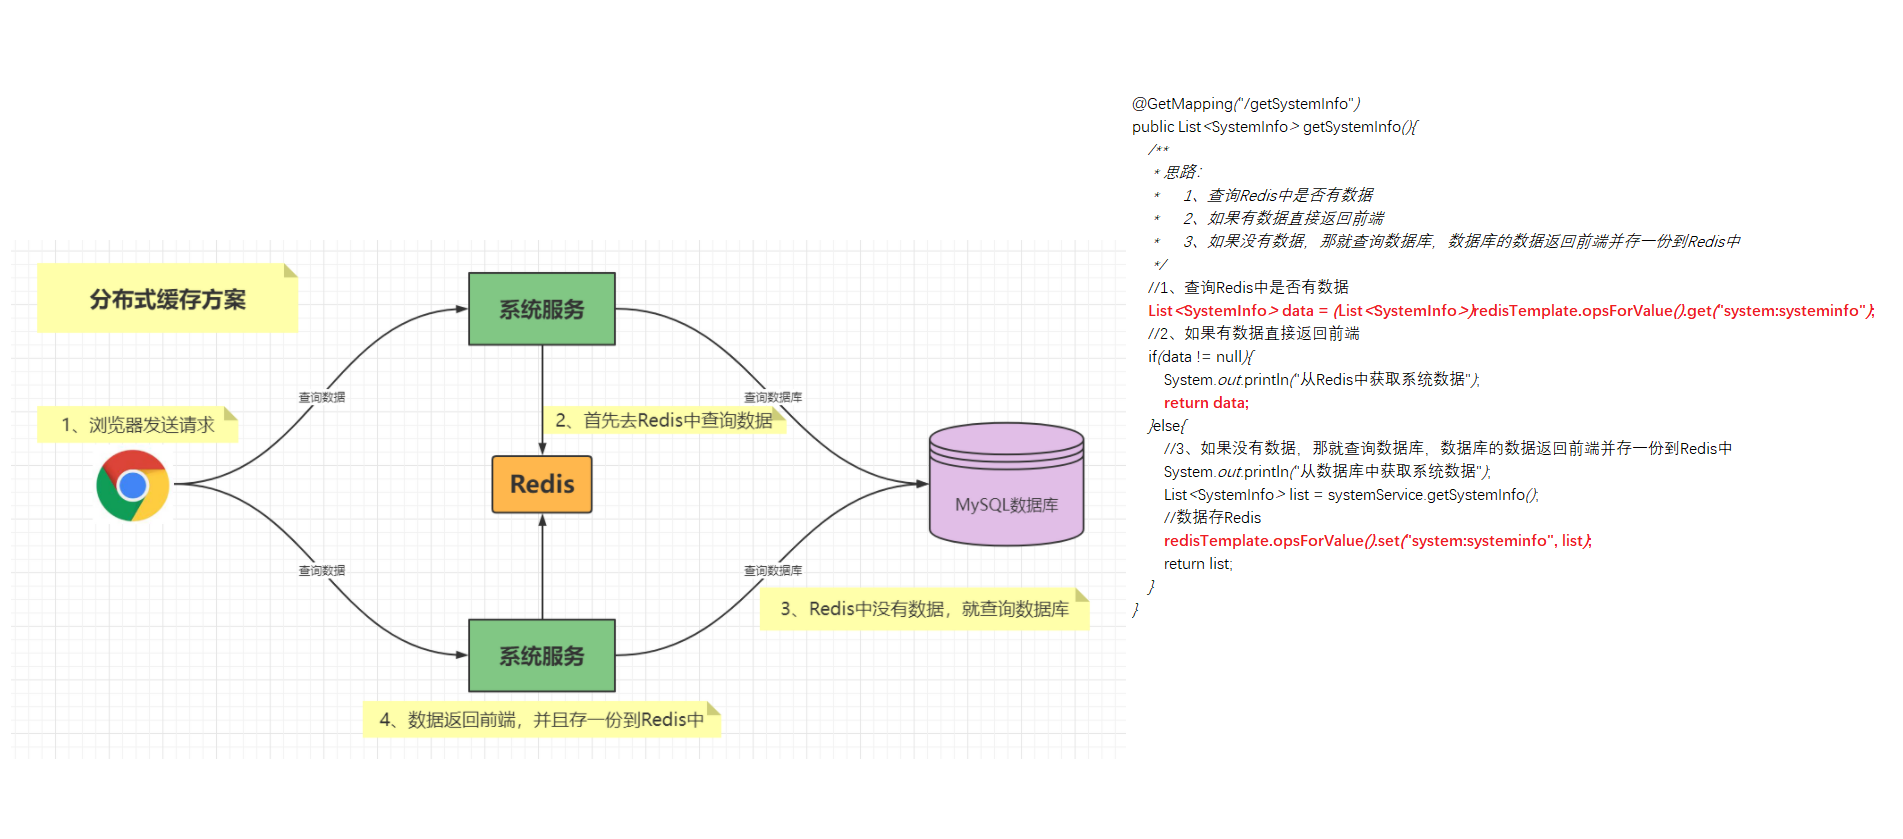
分布式缓存方案
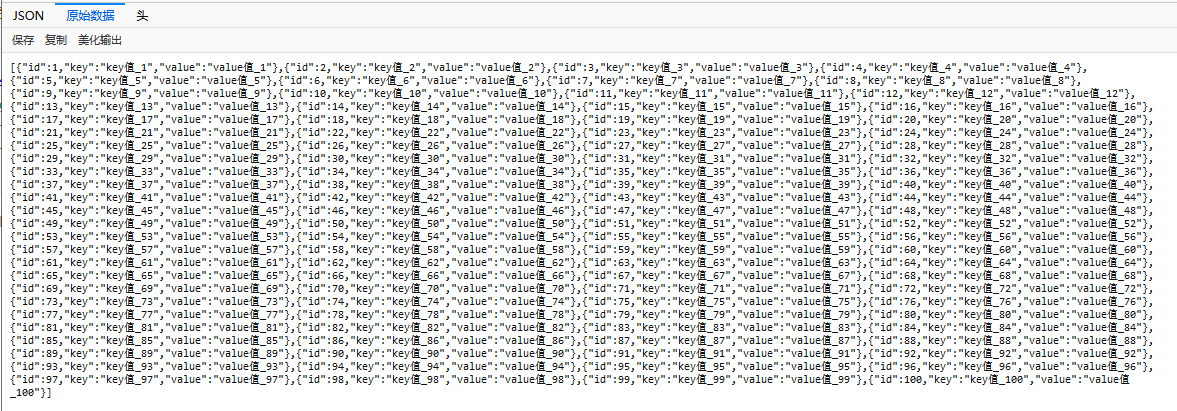
优点: 使用Redis作为共享缓存 ,解决缓存不同步问题Redis是独立的服务,缓存不用占应用本身的内存空间什么样的数据适合放到缓存中呢? 同时满足下面两个条件的数据就适合放缓存: 经常要查询的数据不经常改变的数据 2.2、代码编写controller类: package cn.itsource.controller; import cn.itsource.domain.SystemInfo; import cn.itsource.service.SystemService; import org.springframework.web.bind.annotation.GetMapping; import org.springframework.web.bind.annotation.RequestMapping; import org.springframework.web.bind.annotation.RestController; import javax.annotation.Resource; import java.util.List; /** *系统接口API * * @author 波波老师(微信 : javabobo0513) */ @RequestMapping("/system") @RestController public class SystemController { @Resource private SystemService systemService; /** * 获取系统数据 * @return */ @GetMapping("/getSystemInfo") public List getSystemInfo(){ System.out.println("获取系统数据"); List list = systemService.getSystemInfo(); return list; } }service代码如下: package cn.itsource.service; import cn.itsource.domain.SystemInfo; import org.springframework.stereotype.Service; import java.util.ArrayList; import java.util.List; /** *Service层 * * @author 波波老师(微信 : javabobo0513) */ @Service public class SystemService { //模拟从数据库中查询数据,假设这份数据不经常改动,可能几年才会修改一次 public List getSystemInfo(){ List list = new ArrayList(); SystemInfo systemInfo = null; for(int i=1; i private Long id; private String key; private String value; }测试一下,浏览器访问:http://localhost:8001/system/getSystemInfo,结果如下:
上面的代码我们没有引入缓存处理,每次访问getSystemInfo接口时,都需要调用数据库查询数据,但这份数据不经常变动,那么每次都访问数据库其实是很耗时的,这样的数据时最适合放入缓存的,提高查询数据,不走数据库,那么记下来我们就来改造 package cn.itsource.controller; import cn.itsource.domain.SystemInfo; import cn.itsource.service.SystemService; import org.springframework.beans.factory.annotation.Autowired; import org.springframework.data.redis.core.RedisTemplate; import org.springframework.web.bind.annotation.GetMapping; import org.springframework.web.bind.annotation.RequestMapping; import org.springframework.web.bind.annotation.RestController; import javax.annotation.Resource; import java.util.List; /** *系统接口API * * @author 波波老师(微信 : javabobo0513) */ @RequestMapping("/system") @RestController public class SystemController { @Resource private SystemService systemService; @Autowired private RedisTemplate redisTemplate; /** * 获取系统数据 * @return */ @GetMapping("/getSystemInfo") public List getSystemInfo(){ /** * 编码思路: * 1、先查询缓存,缓存有数据就直接返回 * 2、缓存没有数据就查询数据库 * 3、将查询到的数据返回前端,并存一份到缓存 */ List redisData = (List)redisTemplate.opsForValue().get("system:systemInfo"); if(redisData != null && redisData.size() > 0){ System.out.println("获取系统数据-来自Redis缓存"); return redisData; }else{ System.out.println("获取系统数据-来自MySQL数据库"); List mysqlData = systemService.getSystemInfo(); //存一份到缓存中 redisTemplate.opsForValue().set("system:systemInfo", mysqlData); return mysqlData; } } }浏览器发请求:http://localhost:8001/system/getSystemInfo,页面数据可以正常展示,控制台中打印: 获取系统数据-来自MySQL数据库然后查看Redis中,也可以看到数据正常存到Redis中了,如下:
然后刷新页面3次,控制台打印如下内容: 获取系统数据-来自Redis缓存 获取系统数据-来自Redis缓存 获取系统数据-来自Redis缓存我们发现,此时不管你怎么刷新,控制台都是打印【获取系统数据-来自Redis缓存】了,说明达到我们的目的了,页面展示出来的数据不是来自数据库了,而是从Redis中直接获取到的 2.4、小结
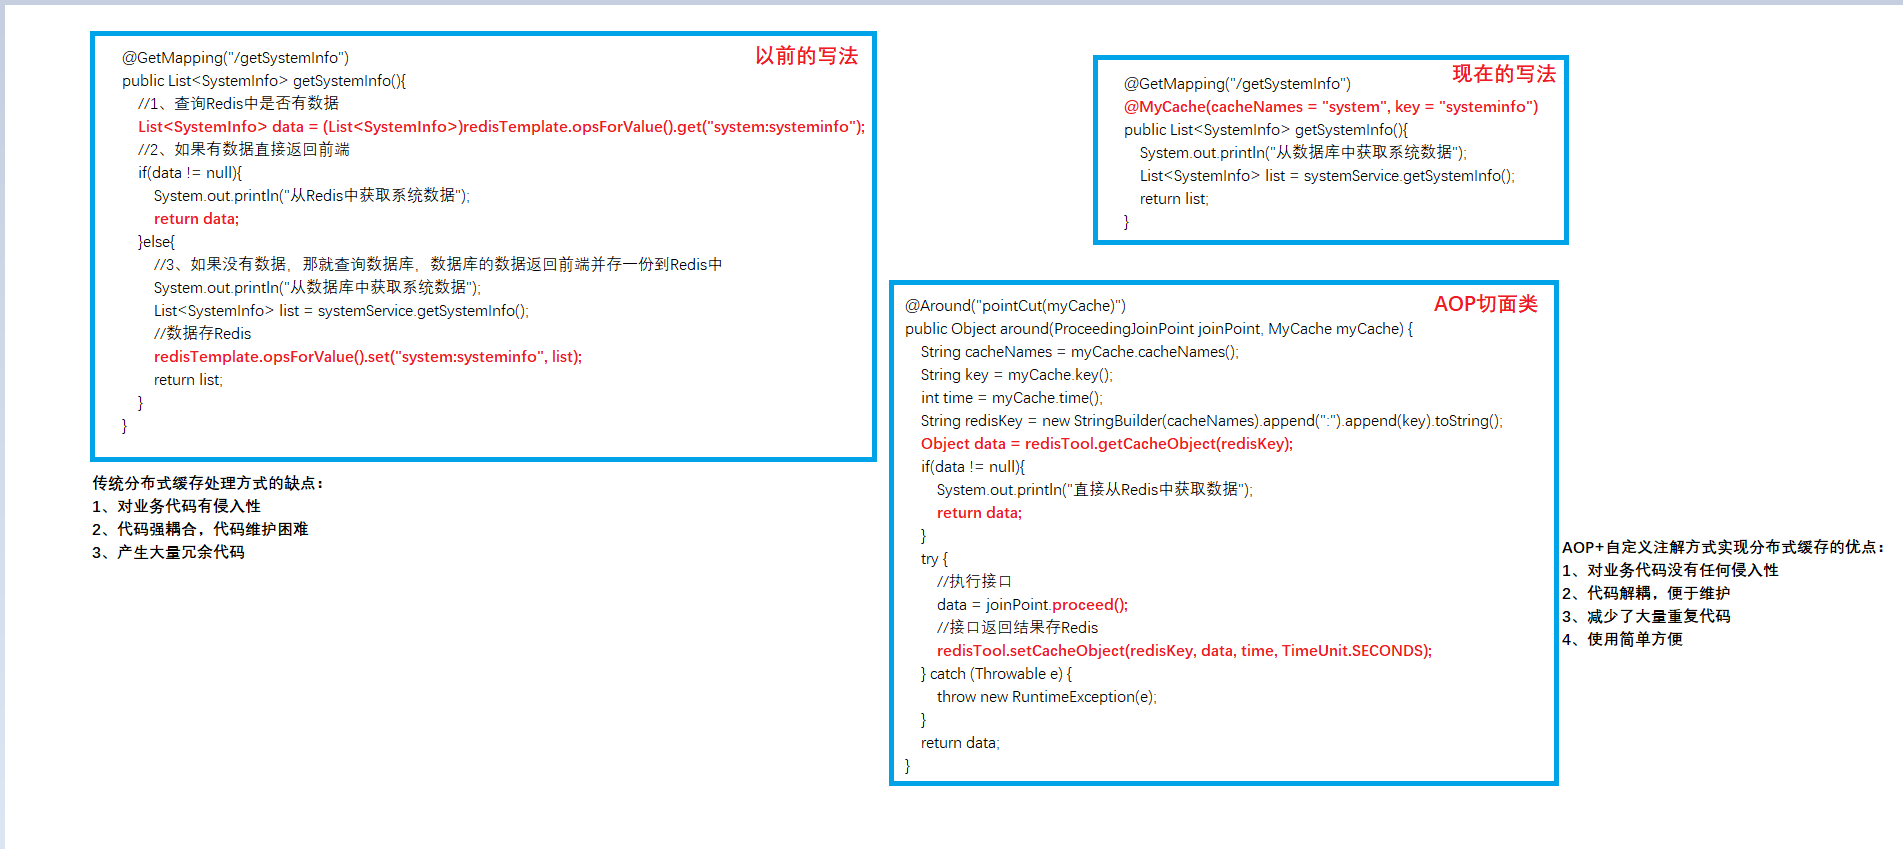
上面功能已经实现了,但是有个问题,那就是每个需要做缓存的接口都需要redisTemplate去取和存一下,会产生大量重复代码,这样太不优雅了,下面我们就是用AOP+自定义注解来消除这些重复代码 3.1、自定义注解代码如下: package cn.itsource.annotation; import java.lang.annotation.ElementType; import java.lang.annotation.Retention; import java.lang.annotation.RetentionPolicy; import java.lang.annotation.Target; /** * @desc 自定义注解:向缓存中添加数据 * @author 波波老师(微信:javabobo0513) */ @Target({ElementType.METHOD, ElementType.TYPE}) @Retention(RetentionPolicy.RUNTIME) public @interface MyCache { String cacheNames() default ""; String key() default ""; //缓存时间(单位:秒,默认是无限期) int time() default -1; } 3.2、AOP切面类导入切面类的依赖: org.springframework.boot spring-boot-starter-aop切面类代码: package cn.itsource.aop; import cn.itsource.annotation.MyCache; import cn.itsource.utils.RedisTool; import org.aspectj.lang.ProceedingJoinPoint; import org.aspectj.lang.annotation.Around; import org.aspectj.lang.annotation.Aspect; import org.aspectj.lang.annotation.Pointcut; import org.springframework.stereotype.Component; import javax.annotation.Resource; import java.util.concurrent.TimeUnit; /** * @desc 切面类,处理分布式缓存添加功能 * @author 波波老师(微信:javabobo0513) */ @Aspect @Component public class MyCacheAop { @Resource private RedisTool redisTool; /** * 定义切点 */ @Pointcut("@annotation(myCache)") public void pointCut(MyCache myCache){ } /** * 环绕通知 */ @Around("pointCut(myCache)") public Object around(ProceedingJoinPoint joinPoint, MyCache myCache) { String cacheNames = myCache.cacheNames(); String key = myCache.key(); int time = myCache.time(); /** * 思路: * 1、拼装redis中存缓存的key值 * 2、看redis中是否存在该key * 3、如果存在,直接取出来返回即可,不需要执行目标方法了 * 4、如果不存在,就执行目标方法,然后将缓存放一份到redis中 */ String redisKey = new StringBuilder(cacheNames).append(":").append(key).toString(); Object data = redisTool.getCacheObject(redisKey); if(data != null){ System.out.println("直接从缓存获取数据"); return data; } try { //执行接口 data = joinPoint.proceed(); //接口返回结果存Redis redisTool.setCacheObject(redisKey, data, time, TimeUnit.SECONDS); } catch (Throwable e) { throw new RuntimeException(e); } return data; } }RedisTool工具类代码: package cn.itsource.utils; import org.springframework.beans.factory.annotation.Autowired; import org.springframework.data.redis.core.RedisTemplate; import org.springframework.data.redis.core.ValueOperations; import org.springframework.stereotype.Component; import org.springframework.util.StringUtils; import java.io.Serializable; import java.util.concurrent.TimeUnit; /** *Redis工具类 * * @author 波波老师(微信 : javabobo0513) */ @Component public class RedisTool { @Autowired public RedisTemplate redisTemplate; /** * 根据key删除对应的value * @param key * @return */ public boolean remove(final String key) { if (exists(key)) { Boolean delete = redisTemplate.delete(key); return delete; } return false; } /** * 根据key判断缓存中是否有对应的value * @param key * @return */ public boolean exists(final String key) { return redisTemplate.hasKey(key); } /** * 写入缓存设置时效时间 * @param key * @param value * @param expireTime * @return */ public boolean setEx(final String key, Object value, Long expireTime) { boolean result = false; try { ValueOperations operations = redisTemplate.opsForValue(); operations.set(key, value); redisTemplate.expire(key, expireTime, TimeUnit.SECONDS); result = true; } catch (Exception e) { e.printStackTrace(); } return result; } /** * 获取锁 * @param lockKey 锁 * @param value 身份标识(保证锁不会被其他人释放) * @return 获取锁成功返回true, 获取锁失败返回false */ public boolean lock(String lockKey, String value) { return redisTemplate.opsForValue().setIfAbsent(lockKey, value); } /** * 释放锁 * @param key * @param value * @return 成功返回true, 失败返回false */ public boolean unlock(String key, String value) { Object currentValue = redisTemplate.opsForValue().get(key); boolean result = false; if(StringUtils.hasLength(String.valueOf(currentValue)) && currentValue.equals(value)){ result = redisTemplate.opsForValue().getOperations().delete(key); } return result; } /** * 获得缓存的基本对象。 * * @param key 缓存键值 * @return 缓存键值对应的数据 */ public T getCacheObject(final String key) { ValueOperations operation = redisTemplate.opsForValue(); return operation.get(key); } /** * 缓存基本的对象,Integer、String、实体类等 * * @param key 缓存的键值 * @param value 缓存的值 * @param timeout 时间 * @param timeUnit 时间颗粒度 */ public void setCacheObject(final String key, final T value, final Integer timeout, final TimeUnit timeUnit) { if(timeout == -1){ //不设置过期时间,表示永久有效 redisTemplate.opsForValue().set(key, value); } else{ redisTemplate.opsForValue().set(key, value, timeout, timeUnit); } } } 3.3、测试测试代码: package cn.itsource.controller; import cn.itsource.annotation.MyCache; import cn.itsource.domain.SystemInfo; import cn.itsource.service.SystemService; import org.springframework.beans.factory.annotation.Autowired; import org.springframework.data.redis.core.RedisTemplate; import org.springframework.web.bind.annotation.GetMapping; import org.springframework.web.bind.annotation.RequestMapping; import org.springframework.web.bind.annotation.RestController; import javax.annotation.Resource; import java.util.List; /** *系统接口API * * @author 波波老师(微信 : javabobo0513) */ @RequestMapping("/system") @RestController public class SystemController { @Resource private SystemService systemService; @Autowired private RedisTemplate redisTemplate; /** * 获取系统数据 */ @GetMapping("/getSystemInfo") @MyCache(cacheNames = "system", key = "systemInfo", time = 120) public List getSystemInfo(){ System.out.println("获取系统数据-来自MySQL数据库"); List mysqlData = systemService.getSystemInfo(); return mysqlData; } }浏览器访问:http://localhost:8001/system/getSystemInfo,页面正常显示数据,控制台打印: 获取系统数据-来自MySQL数据库再多刷新几次,控制台打印: 直接从缓存获取数据 直接从缓存获取数据 直接从缓存获取数据说明我们测试成功 3.4、小结
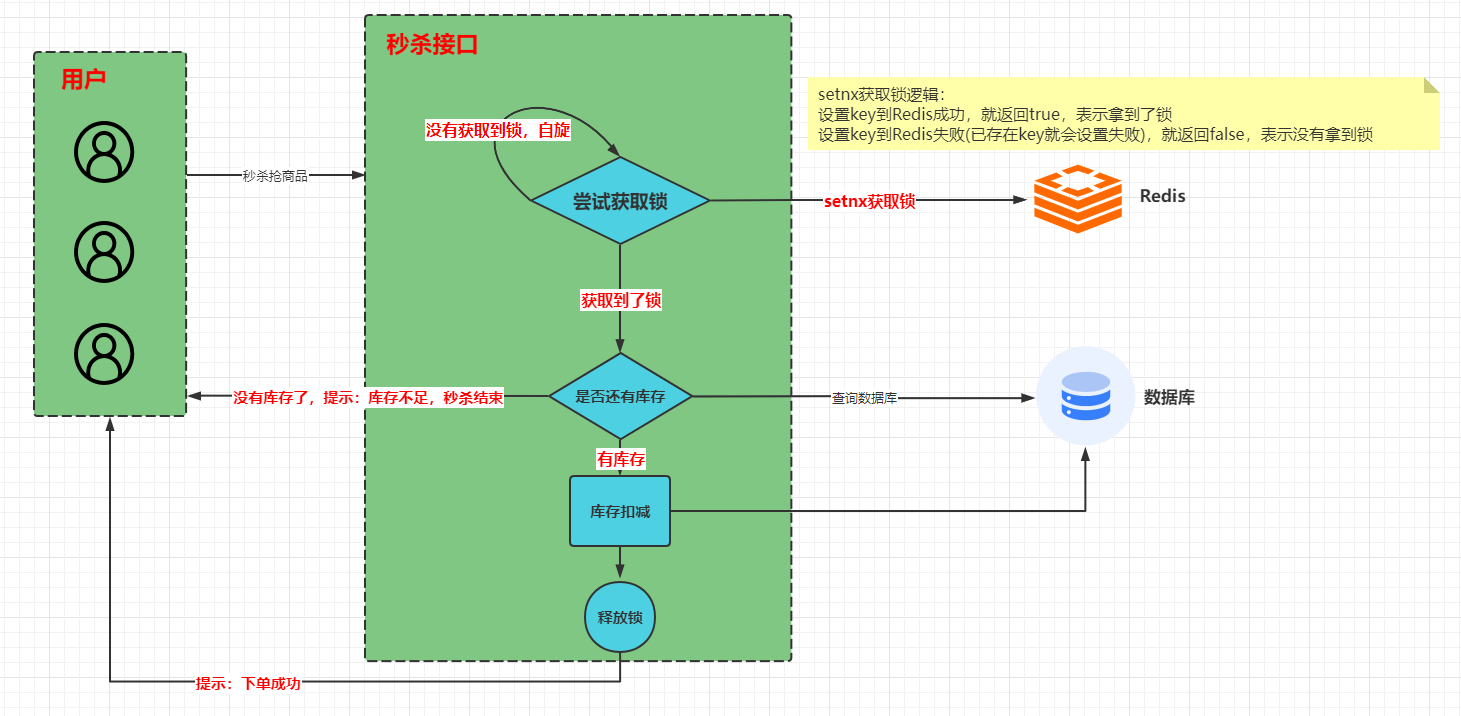
1、传统分布式缓存处理方式的缺点: 对业务代码有侵入性代码强耦合,代码维护困难产生大量冗余代码2、AOP+自定义注解方式实现分布式缓存的优点: 对业务代码没有任何侵入性、代码解耦,便于维护减少了大量重复代码使用简单方便 4、Redis实现分布式锁,解决高并发库存超卖问题先介绍一下场景: 我现在有3台最新款IPhone拿出来做秒杀活动,回馈新老客户,只要9.9元,今晚8点开抢,那肯定有很多人来抢 那么这就是典型的高并发场景,8点那个点会有很多请求进来,可能1秒作用就抢光了,就没有流量了,这种场景我们怎么保证商品不超卖呢? 这就需要用到分布式锁了,下面我就来模拟一下上面所说的场景,库存我就不用MySQL做了,我就放到Redis中了,做个缓存预热
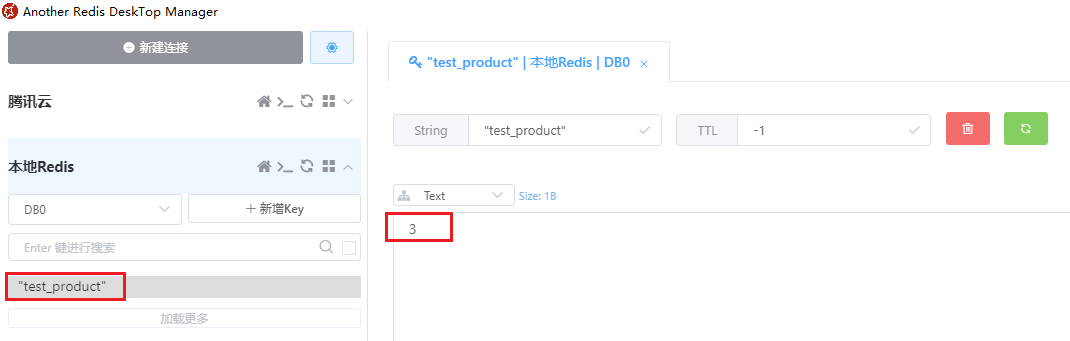
下面在TestController类中新增接口,用来往Redis中添加库存(库存预热): @Autowired private RedisTool redisTool; /** * 初始化库存为3 */ @GetMapping("/stockInit") public String stockInit(){ redisTool.setCacheObject("test_product", 3, -1, TimeUnit.SECONDS); return "初始化库存成功"; }然后用浏览器访问这个方法,就可以看到Redis中有库存3个了,如下:
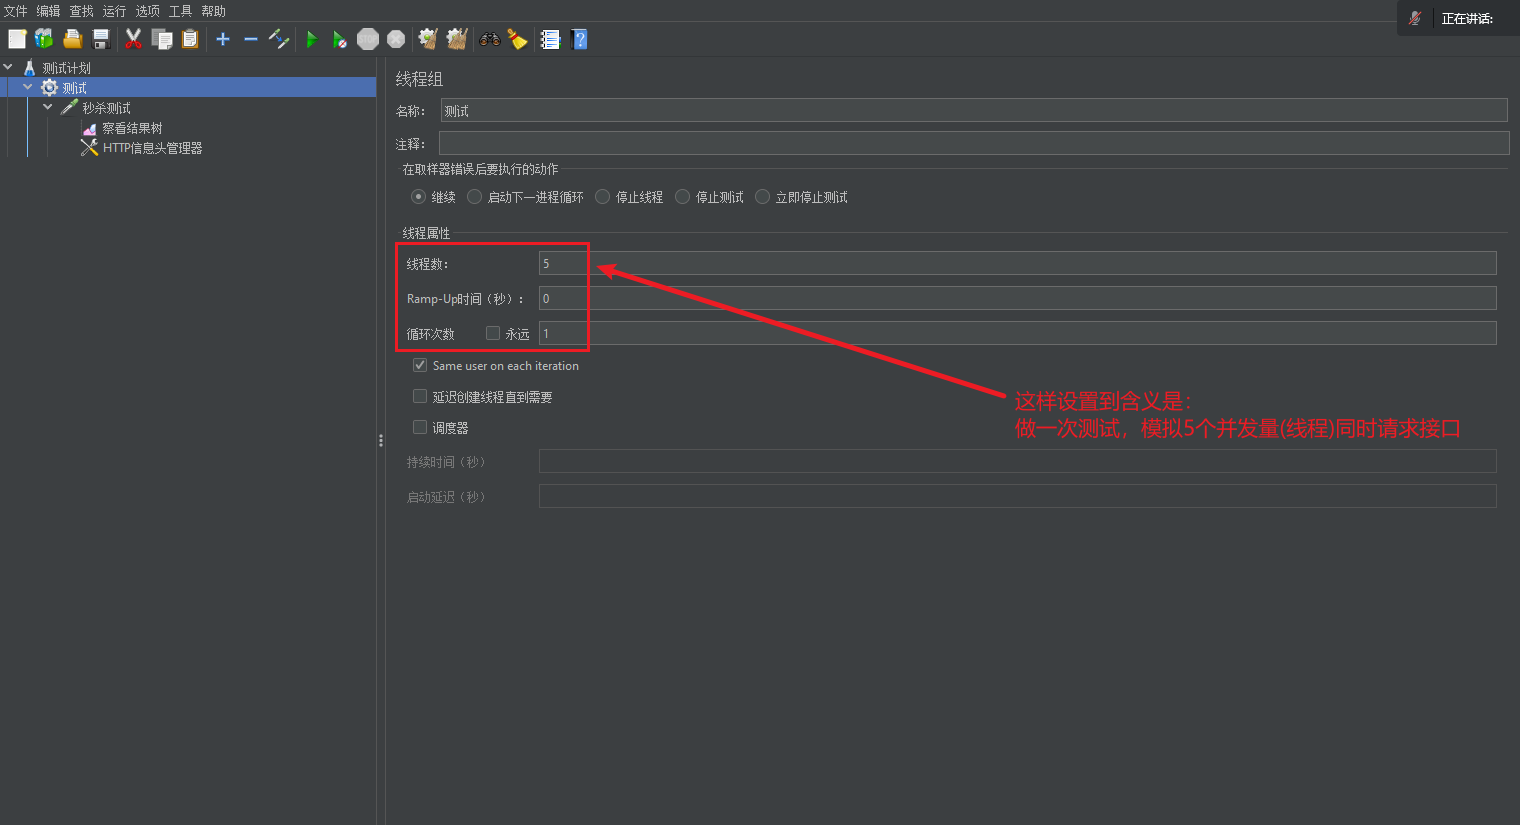
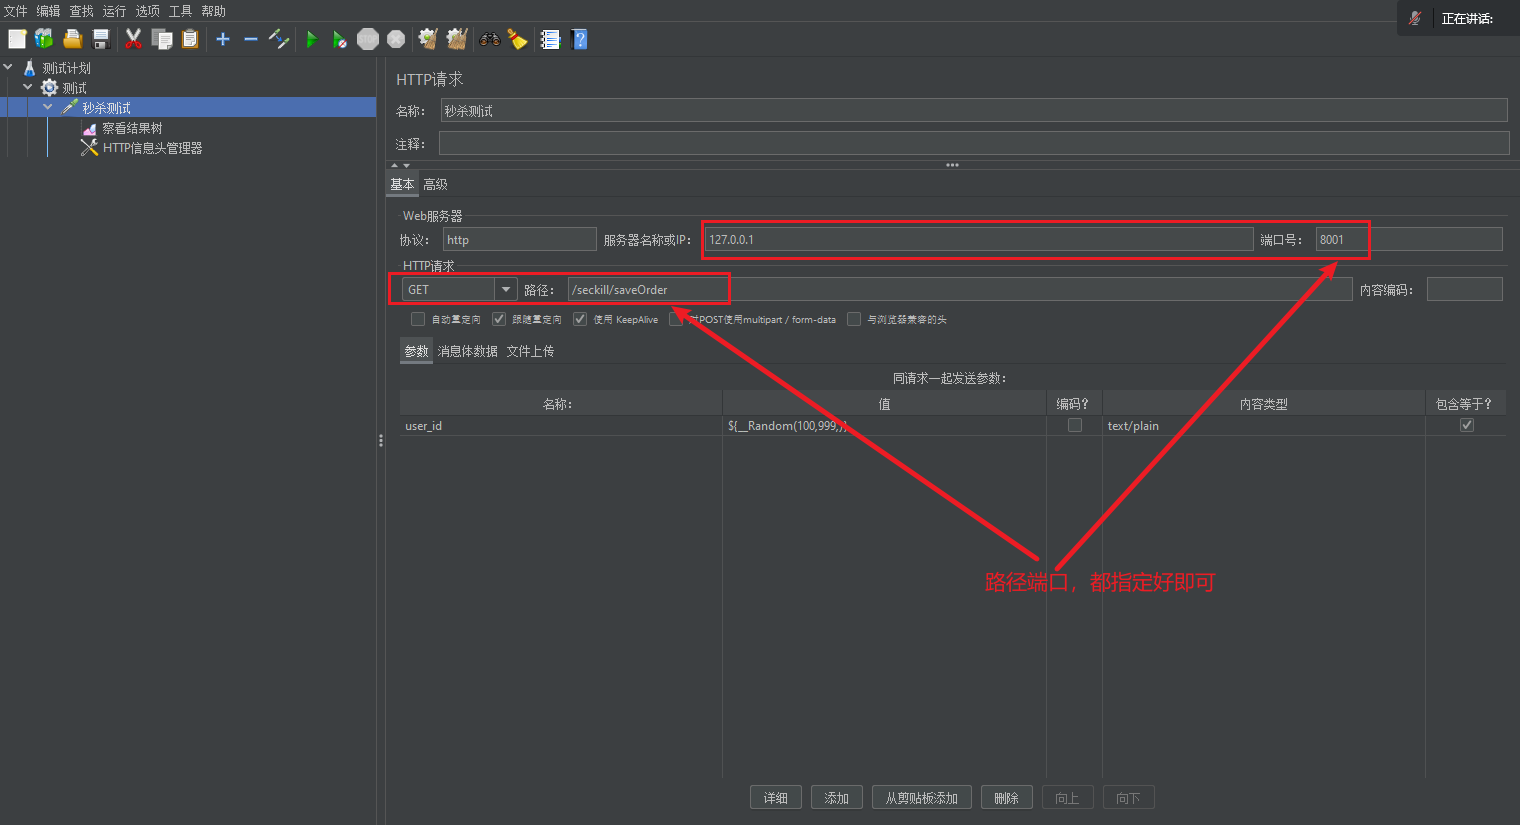
下单接口代码: package cn.itsource.controller; import cn.itsource.utils.RedisTool; import org.springframework.beans.factory.annotation.Autowired; import org.springframework.http.HttpStatus; import org.springframework.http.ResponseEntity; import org.springframework.web.bind.annotation.GetMapping; import org.springframework.web.bind.annotation.RequestMapping; import org.springframework.web.bind.annotation.RestController; import java.util.concurrent.TimeUnit; /** *秒杀API接口 * * @author 波波老师(微信 : javabobo0513) */ @RestController @RequestMapping("/seckill") public class SeckillController { @Autowired private RedisTool redisTool; /** * 用户下单接口 */ @GetMapping("/saveOrder") public ResponseEntity saveOrder(){ String productId = "1001";//假如用户下单的商品ID就是1001,都是秒杀这一个商品 //获取到线程名 String threadName = Thread.currentThread().getName(); try { /** * 既然是秒杀高并发场景,那肯定有很多请求进来,就会有很多线程 * 那么为了不超卖,我这里需要对库存上锁,那么这些线程都需要去尝试获取锁 */ boolean locked = getLock(productId, threadName); //获取到了锁的线程,就可以开始进行库存扣减了 if (locked) { //进入到if了,说明该线程获取到锁了 //这里应该是从数据库查询得到商品剩余库存的,我这里是模拟,直接从Redis中获取到剩余库存 Object test_product = redisTool.getCacheObject("test_product"); if(test_product == null){ ResponseEntity.status(HttpStatus.NOT_FOUND).body("lock error"); } //stock的值,就是当前商品的库存剩余量 int stock = Integer.parseInt(test_product.toString()); //拿到锁了就一定下单成功吗?不一定,还得有库存才能下单成功,所以这里需要判断库存是否大于0,否则会出现库存超卖现象 if(stock > 0){ //运行到此处,说明该线程就可以下单了,秒杀到商品了 System.out.println("线程:" + threadName + "获取到了锁,还有库存量:" + stock); //库存扣减(这里假设每个人只能下单买一个) int currentStock = stock - 1; //更新库存值 redisTool.setCacheObject("test_product", currentStock, -1, TimeUnit.SECONDS); System.out.println("线程:" + threadName + "下单成功,扣减之后库存剩余量:" + currentStock); return ResponseEntity.status(HttpStatus.OK).body("save order success,current stock:" + currentStock); } else{ //运行到此处,说明该线程虽然获取到了锁,但是晚了,库存已经被抢光了 System.out.println("线程:" + threadName + "获取到了锁,没有库存了"); return ResponseEntity.status(HttpStatus.NOT_FOUND).body("stock is zero"); } } //代码走到此处说明没有抢到锁,那就直接返回友好提示 return ResponseEntity.status(HttpStatus.NOT_FOUND).body("save order failed"); } finally { //释放锁 System.out.println("线程:" + threadName + "释放了锁"); redisTool.unlock(productId, threadName); } } //获取锁 public boolean getLock(String key, String value){ boolean lock = redisTool.lock(key, value); if(lock){ return true; }else{ return getLock(key, value); } } } 4.3、秒杀测试我这里使用的是JMeter这款压测工具进行测试的,我的初步设置如下:
然后请求参数:
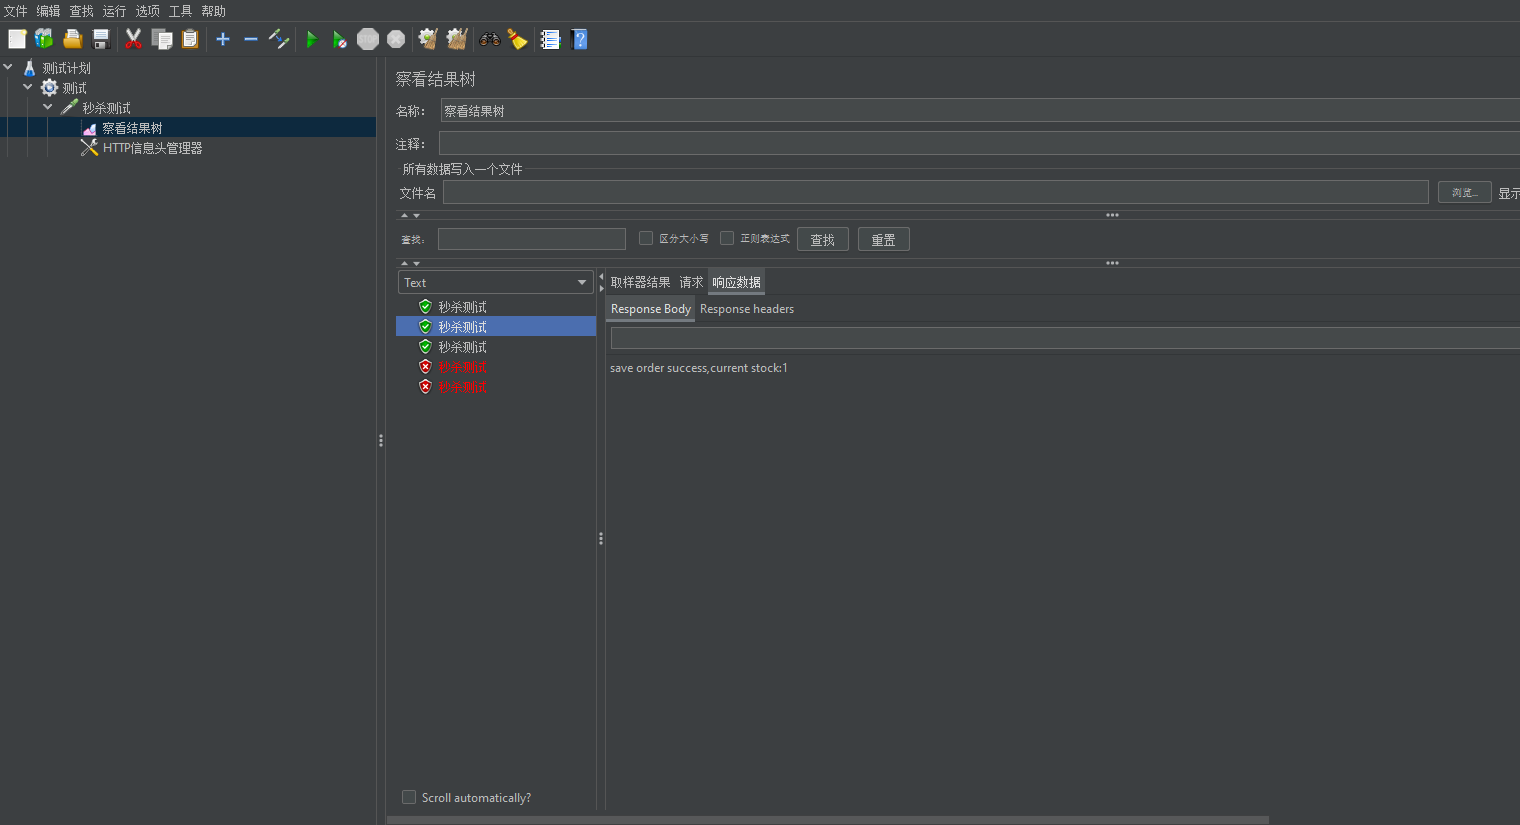
然后我启动测试,结果如下:
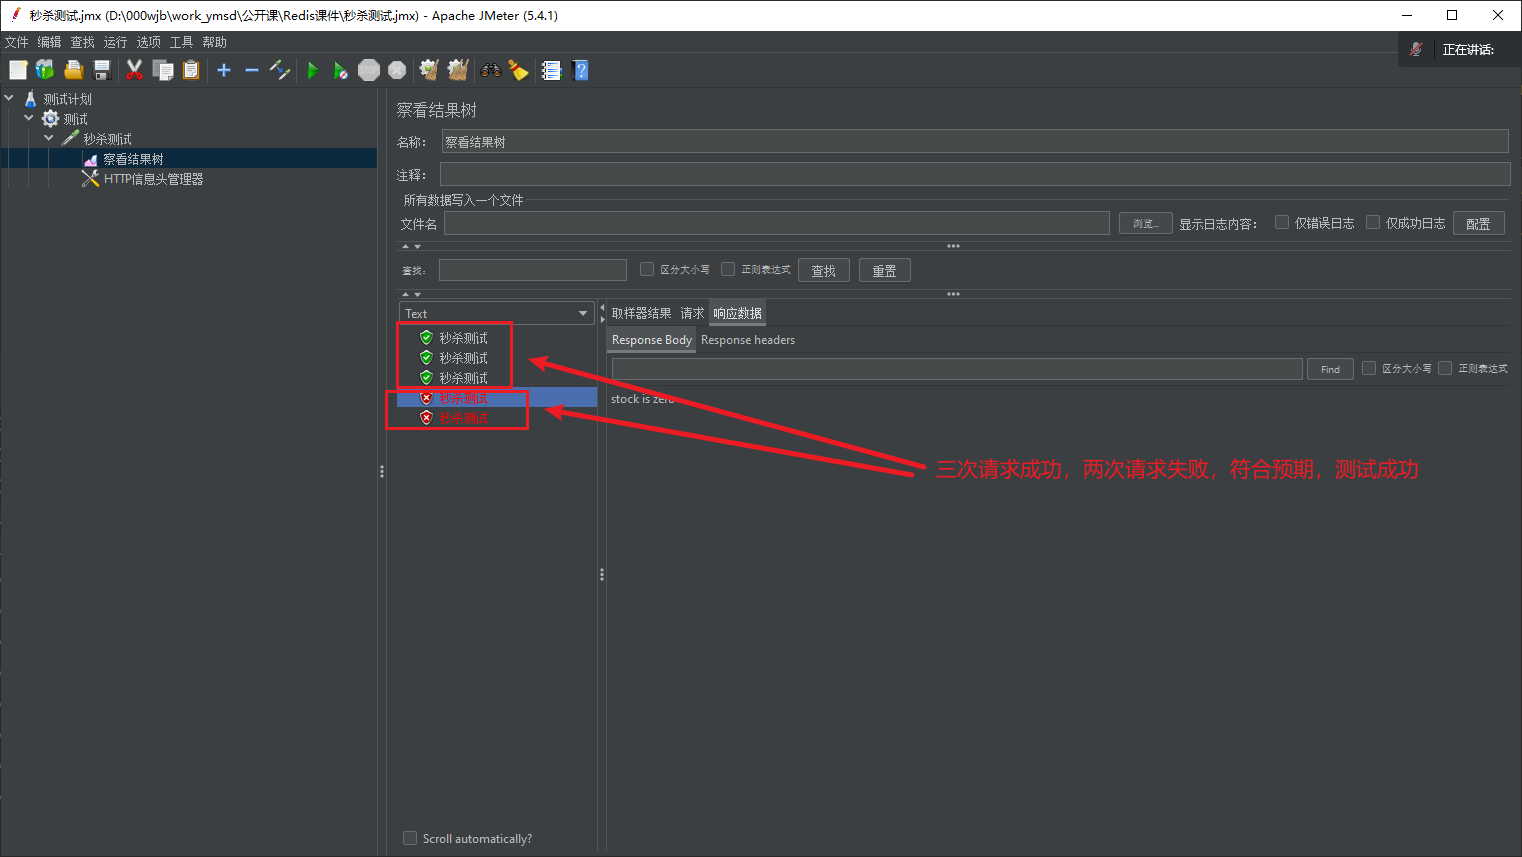
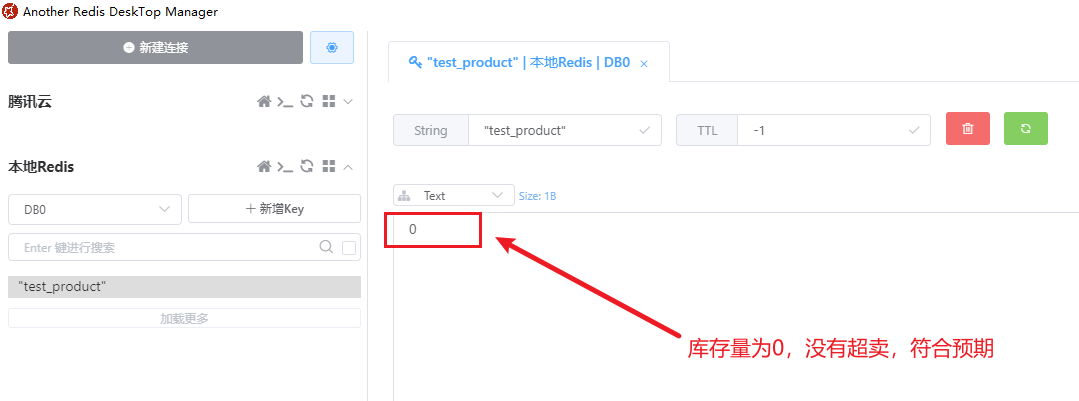
控制台打印结果如下: 线程:http-nio-8001-exec-6获取到了锁,还有库存量:3 线程:http-nio-8001-exec-6下单成功,扣减之后库存剩余量:2 线程:http-nio-8001-exec-6释放了锁 线程:http-nio-8001-exec-1获取到了锁,还有库存量:2 线程:http-nio-8001-exec-1下单成功,扣减之后库存剩余量:1 线程:http-nio-8001-exec-1释放了锁 线程:http-nio-8001-exec-4获取到了锁,还有库存量:1 线程:http-nio-8001-exec-4下单成功,扣减之后库存剩余量:0 线程:http-nio-8001-exec-4释放了锁 线程:http-nio-8001-exec-5获取到了锁,没有库存了 线程:http-nio-8001-exec-5释放了锁 线程:http-nio-8001-exec-7获取到了锁,没有库存了 线程:http-nio-8001-exec-7释放了锁Redis中的库存数量为:
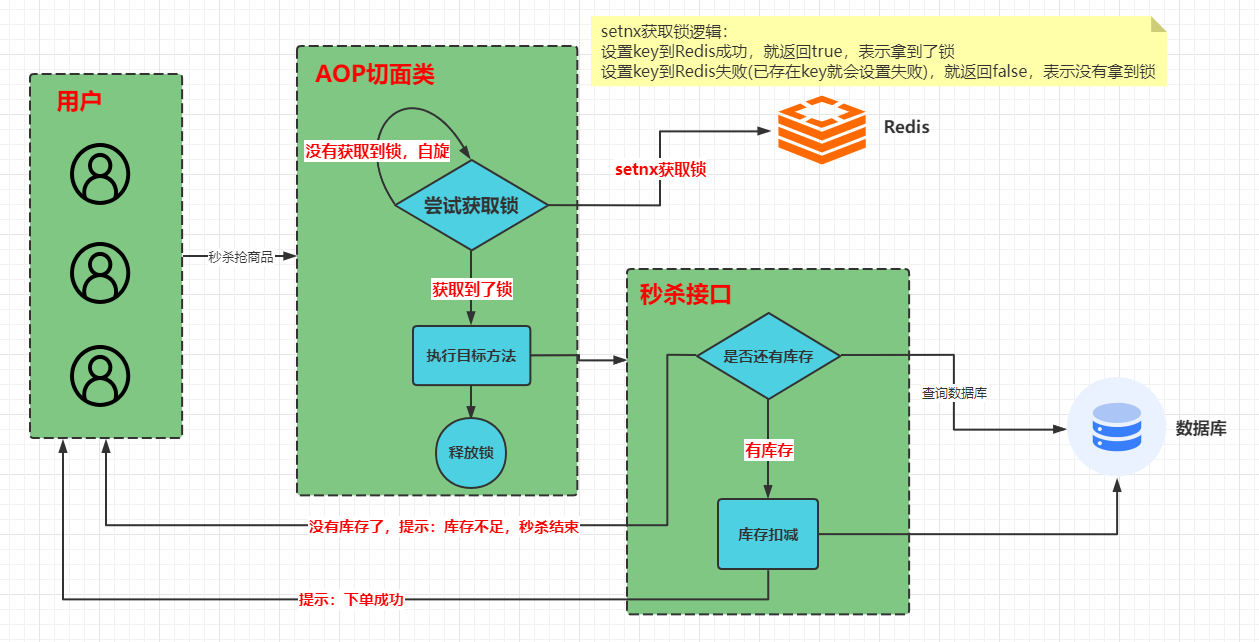
从以上三处测试结果来看的话,我们的测试成功了,完全符合预期,一共5个人同时请购商品,库存一共就三个,结果就应该是3个人抢到了,其他人抢不到 JMeter压测工具软件包下载链接: 链接:https://pan.baidu.com/s/11j1qIcrjp2cIPq0PNNcC6Q 提取码:8888 5、Redis+AOP+自定义注解,优雅实现分布式锁上面已经实现了分布式锁的功能了,但是我们发现,如果一个项目中很多地方都需要使用到分布式锁解决一些并发问题的话,那么这这些接口中就都需要写获取锁、释放锁等代码了,非常冗余了,此时我们可以利用AOP的思想将重复代码抽取出来
切面类 * 被 @RedisLock 所注解的方法,会被 RedisLockAspect 进行切面管理 * * @author 波波老师(微信 : javabobo0513) */ @Slf4j @Aspect @Component public class RedisLockAspect { @Resource private RedisTool redisTool; /** * 环绕通知 */ @Around(value = "@annotation(redisLock)", argNames = "joinPoint,redisLock") public Object around(ProceedingJoinPoint joinPoint, RedisLock redisLock) throws Throwable { //获取入参商品ID String productId = "1001"; //获取到线程名 String threadName = Thread.currentThread().getName(); Object result = null; try { /** * 开始尝试获取锁了,返回true表示当前线程获取到了锁,返回false表示没有获取到锁 */ boolean lock = getLock(productId, threadName); if (lock) { log.info("线程:{},获取到了锁,开始处理业务", threadName); //执行业务逻辑 result = joinPoint.proceed(); //代码运行到这,业务做完,需要释放锁了 redisTool.unlock(productId, threadName); //释放锁 log.info("线程:{},业务代码处理完毕,锁已释放", threadName); } } catch (Exception e) { e.printStackTrace(); } return result; } /** * 尝试获取锁 */ public boolean getLock(String key, String value){ boolean lock = redisTool.lock(key, value); if(lock){ return true; }else{ //没有获取到锁的线程,进行自旋,直至拿到锁为止 return getLock(key, value); } } } 5.3、测试测试代码: package cn.itsource.controller; import cn.itsource.annotation.RedisLock; import cn.itsource.utils.RedisTool; import lombok.extern.slf4j.Slf4j; import org.springframework.beans.factory.annotation.Autowired; import org.springframework.http.HttpStatus; import org.springframework.http.ResponseEntity; import org.springframework.web.bind.annotation.GetMapping; import org.springframework.web.bind.annotation.PathVariable; import org.springframework.web.bind.annotation.RequestMapping; import org.springframework.web.bind.annotation.RestController; import java.util.concurrent.TimeUnit; /** *秒杀API接口-AOP实现方式实现分布式锁 * * @author 波波老师(微信 : javabobo0513) */ @RestController @RequestMapping("/seckill") @Slf4j public class SeckillAopController { @Autowired private RedisTool redisTool; /** * 用户下单接口 */ @GetMapping("/saveOrder/{productId}") @RedisLock public ResponseEntity saveOrder(@PathVariable("productId") String productId){ //这里应该是从数据库查询得到商品剩余库存的,我这里是模拟,直接从Redis中获取到剩余库存 Object test_product = redisTool.getCacheObject("test_product"); if(test_product == null){ ResponseEntity.status(HttpStatus.NOT_FOUND).body("lock error"); } //stock的值,就是当前商品的库存剩余量 int stock = Integer.parseInt(test_product.toString()); //判断库存是否大于0,有库存才做库存扣减 if(stock > 0){ //库存扣减(这里假设每个人只能下单买一个) int currentStock = stock - 1; //更新库存值 redisTool.setCacheObject("test_product", currentStock, -1, TimeUnit.SECONDS); return ResponseEntity.status(HttpStatus.OK).body("save order success,current stock:" + currentStock); } else{ //运行到此处,说明该线程虽然获取到了锁,但是晚了,库存已经被抢光了 log.info("线程:{},拿到锁了,但是库存不足了", Thread.currentThread().getName()); return ResponseEntity.status(HttpStatus.NOT_FOUND).body("stock is zero"); } } }先通过浏览器访问:http://localhost:8001/stockInit,进行库存的初始化 然后再通过JMeter压测工具发请求:
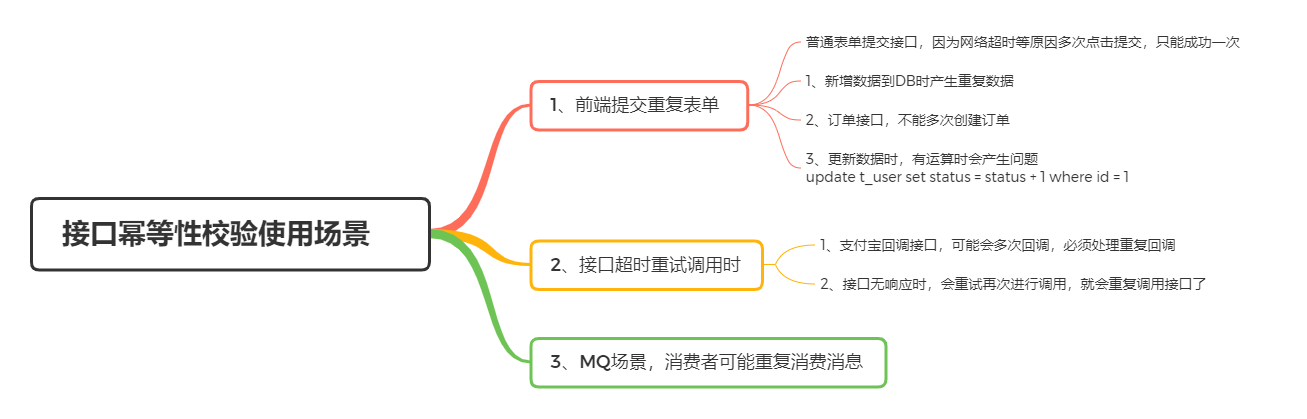
控制台打印结果: 线程:http-nio-8001-exec-95,获取到了锁,开始处理业务 线程:http-nio-8001-exec-9,获取到了锁,开始处理业务 线程:http-nio-8001-exec-95,业务代码处理完毕,锁已释放 线程:http-nio-8001-exec-9,业务代码处理完毕,锁已释放 线程:http-nio-8001-exec-14,获取到了锁,开始处理业务 线程:http-nio-8001-exec-14,业务代码处理完毕,锁已释放 线程:http-nio-8001-exec-90,获取到了锁,开始处理业务 线程:http-nio-8001-exec-90,拿到锁了,但是库存不足了 线程:http-nio-8001-exec-90,业务代码处理完毕,锁已释放 线程:http-nio-8001-exec-92,获取到了锁,开始处理业务 线程:http-nio-8001-exec-92,拿到锁了,但是库存不足了 线程:http-nio-8001-exec-92,业务代码处理完毕,锁已释放我这里一秒钟发了5个请求,从上面测试结果来看的话,我们测试已经成功了,确实只有三个线程购买成功,分布式锁有效果 5.4、小结 通过这样的方式处理分布式锁的话,我们接口中就只用关注业务逻辑代码了,不需要单独写代码处理锁的事情了,非常优雅注意:我上面实现方式是一种简单的实现,会有一些问题,大家可以再加以完善,这里重点理解其思想 6、Redis+拦截器+自定义注解,实现接口幂等性校验方案接口幂等性校验的概念,我们先简单理解下: 就是一个用户对于同一个操作发起一次或多次的请求,请求的结果一致。不会因为多次请求而产生不同的结果
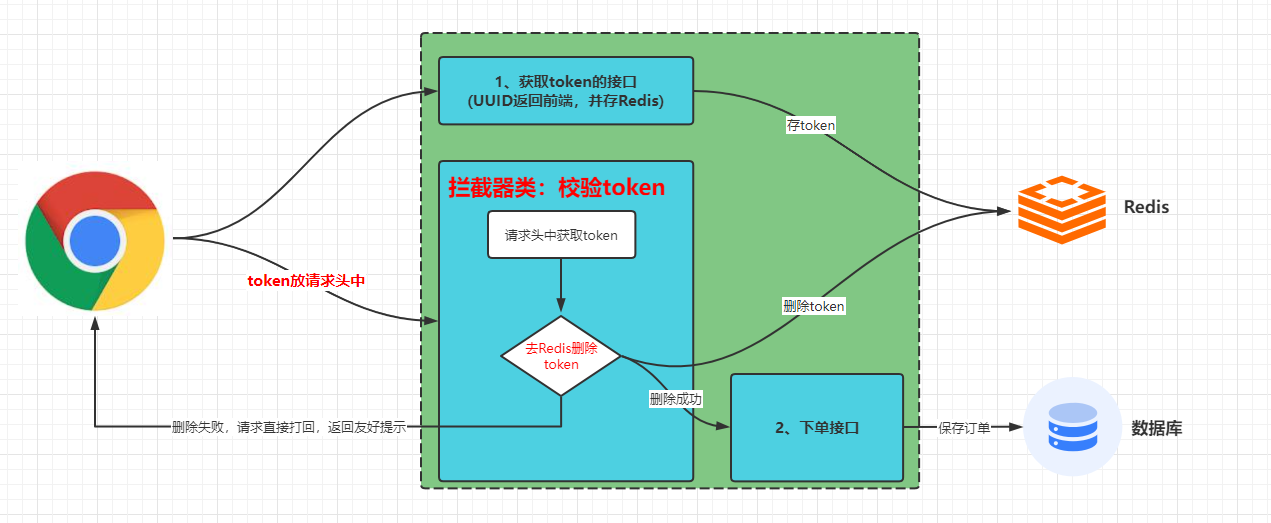
我们这里重点介绍【防重Token令牌】方案 6.2、防重Token令牌介绍
流程大致如下: 服务端提供获取 Token 的接口,该 Token 可以是一个序列号,也可以是一个分布式 ID 或者 UUID 字符串。客户端调用接口获取 Token,这时候服务端会生成一个 Token 串。然后将该串存入 Redis 数据库中,以该 Token 作为 Redis 的键(注意需要设置过期时间)。将 Token 返回到客户端,客户端拿到后,存到LocalStorage中客户端在执行提交表单请求时,从LocalStorage中取出 Token,然后存到请求头中带到后台。拦截器拦截到该请求后,从请求头中获取到 Token 值,然后去Redis中删除该Token如果删除成功,那就说明该请求是第一个被处理的,那就删除Token后放行请求,正常执行目标方法业务逻辑代码即可如果删除失败,那就说明在该请求之前已经有请求将Token值删除了,那么这些请求就不需要再处理了,所以直接抛异常拦截打回,给前端友好提示即可,不需要执行目标方法业务逻辑代码了 6.3、自定义注解 package cn.itsource.annotation; import java.lang.annotation.ElementType; import java.lang.annotation.Retention; import java.lang.annotation.RetentionPolicy; import java.lang.annotation.Target; /** * 接口幂等性校验的自定义注解 */ @Target({ElementType.METHOD}) @Retention(RetentionPolicy.RUNTIME) public @interface CheckIdempotent { } 6.4、拦截器 package cn.itsource.interceptor; import cn.itsource.annotation.CheckIdempotent; import cn.itsource.utils.RedisTool; import org.springframework.beans.factory.annotation.Autowired; import org.springframework.stereotype.Component; import org.springframework.util.StringUtils; import org.springframework.web.method.HandlerMethod; import org.springframework.web.servlet.HandlerInterceptor; import javax.servlet.ServletOutputStream; import javax.servlet.http.HttpServletRequest; import javax.servlet.http.HttpServletResponse; import java.io.IOException; import java.lang.reflect.Method; /** * @desc 接口幂等性校验的拦截器 * @author 波波老师(微信:javabobo0513) */ @Component public class CheckIdempotentInterceptor implements HandlerInterceptor{ @Autowired private RedisTool redisTool; /** * 前置处理 * 该方法将在请求处理之前进行调用 */ @Override public boolean preHandle( HttpServletRequest request, HttpServletResponse response, Object handler) throws Exception { //判断:如果拦截到请求的目标资源不是方法,那就直接返回true放行即可,我们这里只拦截请求方法的请求 if (!(handler instanceof HandlerMethod)) { return true; } HandlerMethod handlerMethod = (HandlerMethod) handler; //获取请求目标的方法对象 Method method = handlerMethod.getMethod(); //获取方法上面的 CheckIdempotent 注解对象 CheckIdempotent methodAnnotation = method.getAnnotation(CheckIdempotent.class); if (methodAnnotation != null) { //不为空,说明该方法打上了 CheckIdempotent 注解,被 CheckIdempotent 注解标记的类,都需要做token校验 try { //做token校验 return checkToken(request); }catch (Exception ex){ writeReturnJson(response, ex.getMessage()); return false; } } //必须返回true,否则会拦截掉所有请求,不会执行controller方法中的内容了 return true; } /** * token校验 */ public boolean checkToken(HttpServletRequest request) throws Exception { //从请求头中获取token的值 String token = request.getHeader("token"); if (StringUtils.isEmpty(token)) { //请求头中不存在token,那就是非法请求,直接抛出异常 throw new Exception("Illegal request"); } //删除Redis中的token boolean remove = redisTool.remove(token); if (!remove) { //删除失败了,说明有其他请求抢先一步删除过了,那么此次请求就不能放行了,属于重复请求 throw new Exception("token delete error"); } return true; } //返回提示信息给前端 private void writeReturnJson(HttpServletResponse response, String message){ response.reset(); response.setCharacterEncoding("UTF-8"); response.setContentType("text/html;charset=utf-8"); response.setStatus(404); ServletOutputStream outputStream = null; try { outputStream = response.getOutputStream(); outputStream.print(message); outputStream.flush(); } catch (IOException e) { e.printStackTrace(); } finally { if (outputStream != null){ try { outputStream.close(); } catch (IOException e) { e.printStackTrace(); } } } } } 6.5、配置拦截器想要以上拦截器起作用需要,配置一下,如下: package cn.itsource.config; import cn.itsource.interceptor.CheckIdempotentInterceptor; import org.springframework.context.annotation.Configuration; import org.springframework.web.servlet.config.annotation.InterceptorRegistry; import org.springframework.web.servlet.config.annotation.WebMvcConfigurationSupport; import javax.annotation.Resource; /** *统一拦截器配置类 * * @author 波波老师(微信 : javabobo0513) */ @Configuration public class WebConfiguration extends WebMvcConfigurationSupport { @Resource private CheckIdempotentInterceptor checkIdempotentInterceptor; //添加拦截器 @Override public void addInterceptors(InterceptorRegistry registry) { //checkIdempotentInterceptor拦截器只对 /saveOrder 请求拦截 registry.addInterceptor(checkIdempotentInterceptor).addPathPatterns("/saveOrder"); super.addInterceptors(registry); } } 6.6、下单接口 package cn.itsource.controller; import cn.itsource.annotation.CheckIdempotent; import cn.itsource.utils.RedisTool; import org.springframework.beans.factory.annotation.Autowired; import org.springframework.http.ResponseEntity; import org.springframework.web.bind.annotation.GetMapping; import org.springframework.web.bind.annotation.RestController; import java.util.UUID; /** *接口幂等性校验-测试 * * @author 波波老师(微信 : javabobo0513) */ @RestController public class CheckIdempotentController { @Autowired private RedisTool redisTool; /** * 获取token */ @GetMapping("/getToken") public ResponseEntity getToken(){ //得到token String token = UUID.randomUUID().toString(); //存入Redis(默认5分钟过期) boolean result = redisTool.setEx(token, token, 300000L); if(result){ return ResponseEntity.ok(token); } return ResponseEntity.ok("token error"); } /** * 用户下单接口 */ @GetMapping("/saveOrder") @CheckIdempotent public ResponseEntity saveOrder(){ System.out.println("**********用户下单成功**********"); return ResponseEntity.ok("saveOrder success"); } } getToken:该接口是提供token值的接口,本质就是一个UUID随机字符串saveOrder:下单接口,方法体中简单打印一句,待会测试时,如果10个请求同时访问,控制台只打印一句的话,那就说明测试成功了,限制住了重复请求 6.7、测试首先通过浏览器访问:http://localhost:8001/getToken,获取到token值 然后通过JMeter压测工具访问 saveOrder 接口,如下:
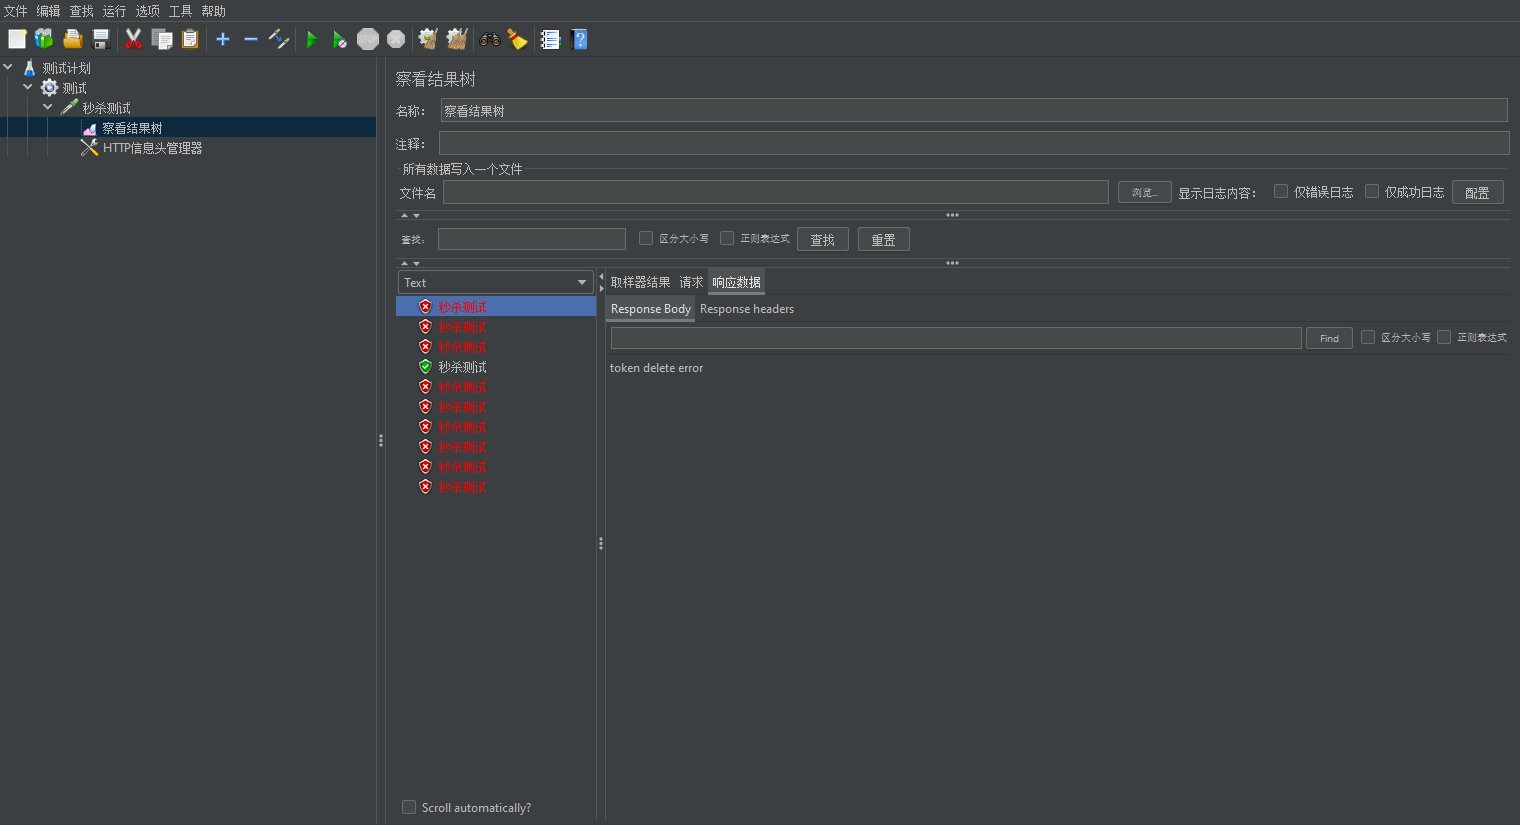
如上图所示,我同时发了10个请求,但是只有一个请求有正常响应,其他请求全部错误,没有进入接口内部,控制台打印结果如下:
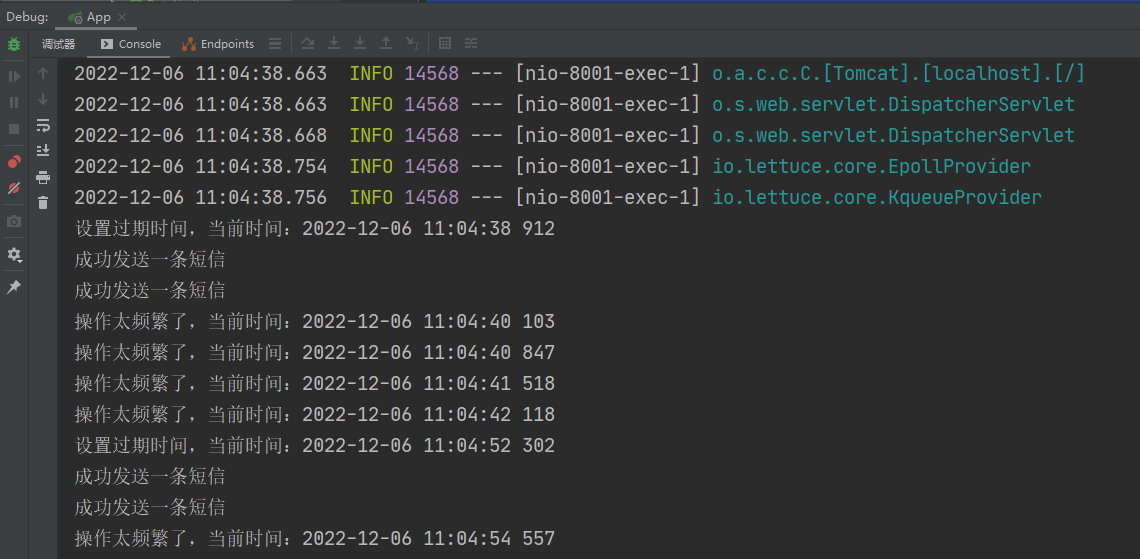
控制台只打印了一次,说明10个请求只有一个进入接口执行了,其余重复请求全部被打回了,达到了我们的测试要求,满足了幂等性需求 6.8、小结这种方式最为优雅,不需要对业务代码和数据库表做更改,没有任何侵入性,需要做幂等性校验的接口就打自定义注解,不需要做幂等性校验的接口就不打,十分灵活方便,很好用 7、Redis+拦截器+自定义注解,实现接口防刷功能 7.1、防刷概述 顾名思义,就是要实现某个接口在某段时间内只能让某人访问指定次数,超出次数,就不让访问了原理:在请求的时候,服务器通过 Redis 记录下你请求的次数,如果次数超过限制就不让访问 7.2、自定义注解 package cn.itsource.annotation; import java.lang.annotation.*; /** * @desc 用于防刷限流的自定义注解 * @author 波波老师(微信:javabobo0513) */ @Target({ ElementType.METHOD }) @Retention(RetentionPolicy.RUNTIME) @Documented public @interface RateLimit { /** 限流的key */ String key() default "limit:"; /** 周期,单位是秒 */ int cycle() default 5; /** 请求次数 */ int count() default 1; /** 默认提示信息 */ String msg() default "Operation is too fast"; } 7.3、拦截器 package cn.itsource.interceptor; import cn.itsource.annotation.RateLimit; import org.springframework.data.redis.core.RedisTemplate; import org.springframework.stereotype.Component; import org.springframework.web.method.HandlerMethod; import org.springframework.web.servlet.HandlerInterceptor; import javax.annotation.Resource; import javax.servlet.ServletOutputStream; import javax.servlet.http.HttpServletRequest; import javax.servlet.http.HttpServletResponse; import java.io.IOException; import java.time.LocalDateTime; import java.time.format.DateTimeFormatter; import java.util.concurrent.TimeUnit; /** * @desc 防刷限流的拦截器 * @author 波波老师(微信:javabobo0513) */ @Component public class RateLimitInterceptor implements HandlerInterceptor { @Resource private RedisTemplate redisTemplate; @Override public boolean preHandle( HttpServletRequest request, HttpServletResponse response, Object handler) throws Exception { // 如果请求的是方法,则需要做校验 if (handler instanceof HandlerMethod) { HandlerMethod handlerMethod = (HandlerMethod) handler; // 获取目标方法上是否有指定注解 RateLimit rateLimit = handlerMethod.getMethodAnnotation(RateLimit.class); if (rateLimit == null) { //说明目标方法上没有 RateLimit 注解 return true; } //代码执行到此,说明目标方法上有 RateLimit 注解,所以需要校验这个请求是不是在刷接口 // 获取请求IP地址 String ip = getIpAddr(request); // 请求url路径 String uri = request.getRequestURI(); //存到redis中的key String key = "RateLimit:" + ip + ":" + uri; // 缓存中存在key,在限定访问周期内已经调用过当前接口 if (redisTemplate.hasKey(key)) { // 访问次数自增1 redisTemplate.opsForValue().increment(key, 1); // 超出访问次数限制 if (redisTemplate.opsForValue().get(key) > rateLimit.count()) { System.out.println("操作太频繁了,当前时间:" + getCurrentTime()); writeReturnJson(response, rateLimit.msg()); return false; } // 未超出访问次数限制,不进行任何操作,返回true } else { // 第一次设置数据,过期时间为注解确定的访问周期 redisTemplate.opsForValue().set(key, 1, rateLimit.cycle(), TimeUnit.SECONDS); System.out.println("设置过期时间,当前时间:" + getCurrentTime()); } return true; } //如果请求的不是方法,直接放行 return true; } //获取当前时间 public static String getCurrentTime(){ LocalDateTime localDateTime = LocalDateTime.now(); return localDateTime.format(DateTimeFormatter.ofPattern("yyyy-MM-dd HH:mm:ss SSS")); } //返回提示信息给前端 private void writeReturnJson(HttpServletResponse response, String message){ response.reset(); response.setCharacterEncoding("UTF-8"); response.setContentType("text/html;charset=utf-8"); response.setStatus(404); ServletOutputStream outputStream = null; try { outputStream = response.getOutputStream(); outputStream.print(message); outputStream.flush(); } catch (IOException e) { e.printStackTrace(); } finally { if (outputStream != null){ try { outputStream.close(); } catch (IOException e) { e.printStackTrace(); } } } } //获取请求的归属IP地址 private String getIpAddr(HttpServletRequest request) { String ipAddress = null; try { ipAddress = request.getHeader("x-forwarded-for"); if (ipAddress == null || ipAddress.length() == 0 || "unknown".equalsIgnoreCase(ipAddress)) { ipAddress = request.getHeader("Proxy-Client-IP"); } if (ipAddress == null || ipAddress.length() == 0 || "unknown".equalsIgnoreCase(ipAddress)) { ipAddress = request.getHeader("WL-Proxy-Client-IP"); } if (ipAddress == null || ipAddress.length() == 0 || "unknown".equalsIgnoreCase(ipAddress)) { ipAddress = request.getRemoteAddr(); } // 对于通过多个代理的情况,第一个IP为客户端真实IP,多个IP按照','分割 if (ipAddress != null && ipAddress.length() > 15) { // = 15 if (ipAddress.indexOf(",") > 0) { ipAddress = ipAddress.substring(0, ipAddress.indexOf(",")); } } } catch (Exception e) { ipAddress = ""; } return ipAddress; } } 7.4、配置拦截器 package cn.itsource.config; import cn.itsource.interceptor.CheckIdempotentInterceptor; import cn.itsource.interceptor.RateLimitInterceptor; import org.springframework.context.annotation.Configuration; import org.springframework.web.servlet.config.annotation.InterceptorRegistry; import org.springframework.web.servlet.config.annotation.WebMvcConfigurationSupport; import javax.annotation.Resource; /** *统一拦截器配置类 * * @author 波波老师(微信 : javabobo0513) */ @Configuration public class WebConfiguration extends WebMvcConfigurationSupport { @Resource private CheckIdempotentInterceptor checkIdempotentInterceptor; @Resource private RateLimitInterceptor rateLimitInterceptor; //添加拦截器 @Override public void addInterceptors(InterceptorRegistry registry) { //checkIdempotentInterceptor拦截器只对 /saveOrder 请求拦截 registry.addInterceptor(checkIdempotentInterceptor).addPathPatterns("/saveOrder"); registry.addInterceptor(rateLimitInterceptor).addPathPatterns("/**"); super.addInterceptors(registry); } } 7.5、接口准备 package cn.itsource.controller; import cn.itsource.annotation.RateLimit; import org.springframework.http.ResponseEntity; import org.springframework.web.bind.annotation.GetMapping; import org.springframework.web.bind.annotation.RestController; /** *接口防刷-测试 * * @author 波波老师(微信 : javabobo0513) */ @RestController public class RateLimitController { /** * 发短信接口 * 6秒内只能访问2次 */ @RateLimit(key= "sendSms", count = 2, cycle = 6) @GetMapping("/sendSms") public ResponseEntity sendSms() { System.out.println("成功发送一条短信"); return ResponseEntity.ok("sendSms success"); } } 7.6、测试通过浏览器访问:http://localhost:8001/sendSms,然后一直刷新页面,看控制台输出语句:
通过输出语句,我们可以分析得到:6秒内确实只能访问接口两次,其余访问全部拒绝掉了,达到了测试目的 7.7、小结 通过自定义注解的方式做接口限流防刷非常的优雅,需要做接口防刷限流的就可以打这个注解,而且参数可根据不同场景随意自定义,不需要做接口防刷和限流的接口可以不打对接口内部的业务代码没有任何侵入性,后期维护方便,扩展性强 8、总结 本文主要是介绍了【Redis+自定义注解+拦截器/AOP】等组合技术栈,可以实现的一些功能,常见场景大家主要体会拦截器和AOP思想即可,可以用来做一些公共操作,方便统一处理,统一维护,扩展性强希望本文对大家有所帮助 |


【本文地址】
今日新闻 |
推荐新闻 |